You'll never believe how quick and easy it is for you to install a DNN site now!
First, open nvQuickSite. You'll be presented with a first step.
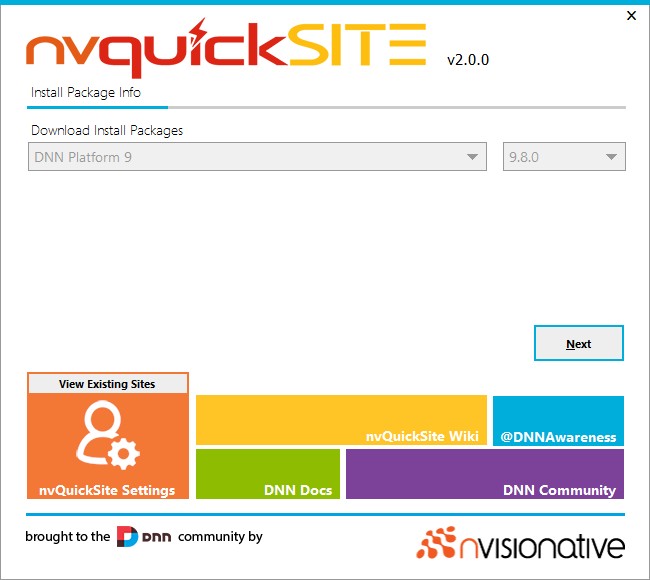
Step 1: Install Package Info
Here, you can choose to select an existing DNN installation package from somewhere on your computer, or download a package if you don't already have one ready. If you want to download a package, simply choose the desired version of DNN, then click the arrow button to begin the download. Once the download completes, the package will automatically be made available in the Local Install Package location below.
Alternatively, you can just choose the local install package using the ellipsis button.
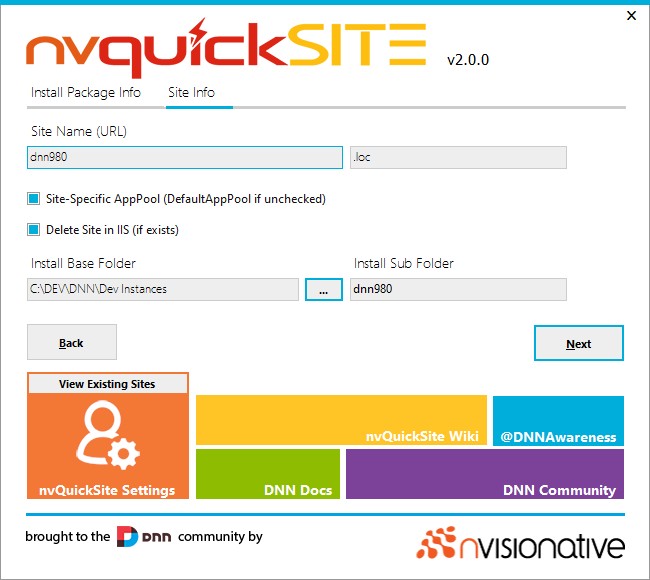
Step 2: Site Info
In this step, we'll define how the site gets configured with IIS and where in your folders the site will be installed.
The Site Name (URL) is any domain or URL you want the site to respond to, such as dnndev.me or localhost.dev. If you want your site to respond to http://dnndev.me, simply enter dnndev.me into the Site Name (URL) field. Don't worry about what you put in here. The domain name you specify here will be added to your HOSTS file.
Site Specific AppPool will create an application pool that is not shared by any other sites in IIS. If you uncheck this setting, the site will be added to your default application pool. It's very possible that you might be replacing an existing site that you've installed in the past. If this is the case, keep the Delete Site in IIS checkbox checked to replace the site definition.
The Location is where you'd like for the website files to "live" in your system. For example, you might have a folder in the root of your system with the path of C:\Websites\ where you put all of your sites you develop. Choose your desired location using this setting. If you choose a location that already has files and folder in it, those files and folders will attempt to be deleted.
If you forget to set these settings, you'll get a reminder to do so.
Oh, and don't worry. If you accidentally choose a location that already has files, the app won't wipe them out. You'll be warned first. You can't blame the app if you click "Yes" here though.
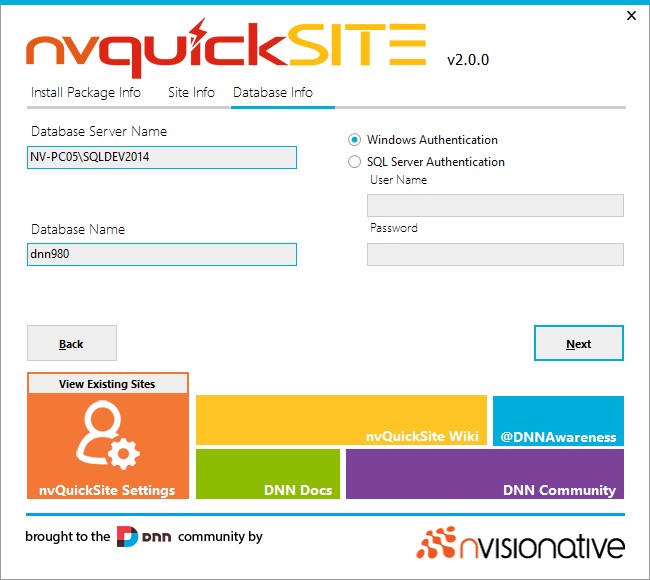
Step 3: Database Info
This step allows you to specify your data source.
The Database Server Name should be the fully qualified name, or the IP address of where the website should look to install the DNN database. In most cases, this should be left as-is. However, you might need to add an instance name. For example, if you have a default instance of SQL Server 2012, it would remain (local). If you have SQL Server 2014 installed on the same machine, you might be using an instance name, such as (local)\MSSQL2014.
The Database Name is the name that you wish your database to have. In most cases, it's a good idea to have this match the site name from the previous step, without any special characters of course.
The authentication options are there for those of you that have special requirements in your environment. In most cases, you can simply leave these settings as-is.
Click "Next" to continue.
Step 4: Progress
This isn't really a step at all. At this point, you'll just watch in awe as the app does all of the work for you.
Once the installation process is complete, you'll see a big "Visit Site" button. Clicking that button will open your new site in your default web browser, and close nvQuickSite.